
 Technical FAQ
Hint: Use Ctrl+F (Command+F) to find key words on this page.
Technical Difficulties
- How do I get tech support?
- How do I log into the course?
- I am unable to access Sakai.
- My course is not showing up when I log in.
- How can I change my username and password in Sakai?
- I can log into Sakai from my school computer, but not from my home computer. What can I do?
- How do I find out what version of the Windows Operating System I'm using?
- Can I use AOL to access PLS online courses?
- What browsers can I use?
General Questions
- Where is my course?
- Where can I find out what reading is required?
- Why is the spellcheck button in the text editor grayed out?
- How do I install the spell check program?
- How do I know if anyone else is in the course at the same time as me?
- How do I change the courses listed in my Quicklinks?
- What's "My Workspace"?
- How do I print part of the course?
- How do I know where to submit my work?
Discussions
- How do I copy and paste into a forum?
- When I copy and paste from a Word document into a forum, I get unusual symbols in my text. How do I get rid of these strange marks?
- What's the difference between a Forum, Topic, and Thread?
- When I read a Forum thread and then use another tool, when I return to Forums it brings me back to the thread I was just reading. How do I get back to the main page of the Forums?
- How do I find new posts in the forums?
Blog
- I typed my blog post text and clicked Save, but my text disappeared. Why?
- Will anyone outside the course be able to read my blog entries?
- I posted to my blog, but my classmates can't see what I wrote. Why not?
- My whole blog post showed up in the list of all posts. How do get just a summary to appear?
- Can I edit a blog comment?
Wiki
- What's the difference between editing a wiki page and commenting on it?
- How will my facilitator know what work I did on the wiki?
- Can multiple people edit the wiki at the same time?
- Why is my picture just a placeholder instead of an image in the wiki?
Chat
Calendar
- How can I change the time zone so it matches where I am?
- Can I add my own deadlines and events to my Calendar?
Grades
- How do I find my grades?
- What does P or NP mean for my grade?
- How do I see my facilitator's comments on my assignments?
- How do I review my results on a quiz?
Messages
Downloading Files
- I clicked on a link, but my computer says that it cannot find the file.
- What is the difference between an RTF and PDF?
- Why don't the PDF links open for me?
- Some of the PDFs open for me, but some don't. What can I do?
- Why don't the RTFs open for me?
External Sites
- What is appropriate to post on external sites like blogs and wikis outside of Sakai?
- What do I do if I'm contacted by a spammer through an external site?
Technical Difficulties
Q: How do I get tech support?
A: First, click Help in the left navigation. From there, click Technical Support for 24/7 Sakai support. From Support, you have several options:
- Frequently Asked Questions: This page lists frequently asked questions by participants and facilitators with complete answers provided. If you don't find the answer to your question on this list, you might try that FAQ.
- Contact Us : From this page you can submit a request for help. (Note: You may want to try the Browser Check before contacting support, as this may help identify the problem and give the technical support analyst more information to assist you.)
- Check Case Status: If you have already submitted a request and have the case number, you can check on the status.
- Browser Check: Follow the directions to see if you are using a supported browser and to test necessary settings.
You will be able to find answers to most technical questions on these support pages. You can also call a toll-free number (1-888-915-9533) to talk to someone in person or chat live with a support representative.
Second, you can click Help at the bottom of the left navigation bar and then search the Sakai help.
Third, contact your facilitator. Please give your facilitator as much information as possible: type of computer (PC or Mac), operating system, the exact place in the course where you have a problem (Module, Topic, Learning Activity), a brief description of what your problem is, and explanation about what you've already tried to do to remedy the problem.
Finally, if your facilitator is unable to help you, contact Leah Tucker in the PLS IT department. You may reach her by phone during business hours (Central Time) at 800-862-7263 x 2003 or email ltucker@plsweb.com.
Q: How do I log into the course?
A: Follow these steps:
- Open one of the recommended browsers (Internet Explorer 7 or Firefox 2).
- Type in the URL http://pls.rsmart.com.
- Enter the Username and Password you received in the email from PLS.
- Click “Login.”
- Click on the course title.
Q: I am unable to access Sakai.
A: You must have cookies enabled in your Web Browser in order to access Sakai. Please follow the instructions below to adjust your “Cookie” settings.
To view or modify cookies settings in Internet Explorer, follow these steps:
- On the top menu, click “Tools” then click “Internet Options.”
- Click on “Privacy Tab.”
- Click on “Advanced.”
- Then check the box for “Allow Session Cookies.”
- Click “OK” and Click “OK” again.
NOTE: “Session Cookies” are deleted when you quit your browser application. “Persistent Cookies” remain on your computer.
Q: My course is not showing up when I log in.
A: You may log into Sakai approximately one week before your course is available. Your course is available for you to view on the day the course opens. Please check the start date of your course.
Q: How can I change my username and password in Sakai?
A: You may change your password, but not your username. Log into Sakai and click Account from your workspace.
Q: I can log into Sakai from my school computer, but not from my home computer. What can I do?
A: Make sure your home computer meets the technical requirements and that your computer's security settings are accepting cookies and popups.
Q: How do I find out what version of the Windows Operating System I'm using?
A: Go to “My Computer,” right-click the icon and click “Properties” from the drop-down menu. The dialog box will give you this information in the “General” tab.
Q: Can I use AOL to access PLS online courses?
A: No, Sakai, the PLS Learning Management System, doesn't operate properly using AOL.
Q: What browsers can I use?
A: Internet Explorer 7 (PC) or Mozilla Firefox 2 (PC or Mac). Other browsers may work some of the time but have issues with certain features in Sakai, or may not work at all.
General Questions
Q: Where is my Course?A: When you first log into Sakai, you always start in your personal Workspace. Look for your course in the Quicklinks at the top of the page under the PLS logo.
Alternatively, you can click My Sites to see a list of all courses and sites which you can access.
Q: Where can I find out what reading is required?
A: In the navigation menu for each module of your course, click the links for Topic A, Topic B, etc. These topic pages contain an overview of the content in that topic as well as information on reading, additional resources, multimedia such as audio or video, Key Information, and activities.
Q: Why is the spellcheck button in the text editor grayed out?
A: Spellcheck is only available in Internet Explorer; Firefox users (including all Mac users) unfortunately, do not have a spellcheck option at this time. You may want to write your work in a word processing program first and then copy and paste it into Sakai's text editor.
Q: How do I install the spell check program?
A: Spell check is only available in Internet Explorer. You should save your work in a word processing document before installing the spell check application, as you may be required to restart your browser before the spell check will be available. Turn off any pop-up blockers before installing this program.
- Click the spell check button in the text editor. (The text editor is available in multiple tools in Sakai. For example, you can use the Forums tool for this; start as if you were creating a new post in a discussion.)
- You will see this error message. "Spell checker not installed. Do you want to download it now?" Click OK.
- A page called "ieSpell" should open in a new window. If it doesn't open, go to the ieSpell page.
- Click the first download now! link in the list from CNET Downloads.
- When the CNET page opens, click Download Now.
- If you see a warning at the top of your window, choose to allow the download.
- When asked to Run or Save, click Run.
- If you see any other security warnings, choose to Run or Allow the program.
- Follow the directions in the wizard to install the program.
- Return to Sakai. If the spell check is still not available to you, try closing and restarting Internet Explorer.
- If spell check still isn't available, try restarting your computer.
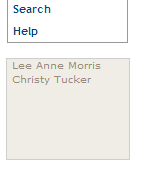
Q: How do I know if anyone else is in the course at the same time as me?
A: In the lower left corner of all course sites, below the left navigation, you'll see a gray box with list of all people currently in the course.
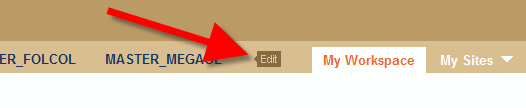
Q: How do I change the courses listed in my Quicklinks?
A:
- To change the courses in your Quicklinks in the top navigation, click Edit to the right of your courses list.
- In the list of Active Sites, select a course you want to move.
- Click the up and down arrows to the left of the list to change the order. If you have many courses, only the first four will appear in your links.
- When you have the course order set the way you want, click Update Preferences.
Q: What's "My Workspace"?
A: Your Workspace is your own private space in Sakai that lets you do a number of tasks.
- From the Account link your Workspace, you can change your password.
- Create a Profile to make it easier for your classmates and facilitator to get to know you.
- See a Calendar of events and deadlines from all courses in which you are enrolled.
- Read Announcements from all your courses, collected in one place.
- Use Resources to store files so you can access them from multiple computers or put files in a publicly visible folder to share within your course.
- Set up Web Content links to sites you visit frequently.
Q: How do I print part of the course?
A: You can print pages from within Sakai. The instructions below are for individuals using Windows as their operating system.
- Open up your course site. Go to the section of your course that has the document or text you wish to print.
- From here you have three options:
Option 1 (Internet Explorer only):
- Place your cursor (i.e., arrow, mouse) somewhere in the middle of the entire body of text that you wish to print.
- Right click on your mouse, and a menu will appear.
- Select the "Print" option.
Option 2:
- Open up a word processing program such as "Microsoft Word" or "Notepad" (New Document).
- Place your cursor somewhere in the middle of the entire body of text that you wish to print.
- Press the "Ctrl" button and the "A" button on your key board at the same time; this should select (highlight) all the text.
- Press the "Ctrl" button and the "C" button on your key board at the same time; this should copy the selected (highlighted) text onto your "Virtual Clipboard."
- Go to the "New Document" of the previously opened word processing program ("Microsoft Word" or "Notepad").
- Next, place your cursor anywhere in the "New Document", and press the "Ctrl" button and the "V" button on your keyboard at the same time; this should paste the text from your "Virtual Clipboard" into the "New Document."
- Lastly, you should go to "File" in the top menu and select the "Print" option; or you can press the "Ctrl" button and the "P" button on your key board at the same time and this will also print the entire "New Document."
Option 3:
- From within your browser, click "File," then "Print." Note: this may print content you don't want, such as the left navigation.
Q: How do I know where to submit my work?
A: Activities in PLS courses may be submitted using a number of different tools: Assignments, Forums, Blog, Wiki, and more. In the directions for each activity, you will see a location in brackets such as [Forum] or [Assignments]. This tells you where to submit your work. Be sure to read the directions carefully as some assignments may require submission in multiple locations or use an external site for work.
Discussions
Q: How do I copy and paste into a forum?
A: Follow the instructions below:
- Open the Microsoft Word document that you wish to post into the Forums.
- Place and click your mouse cursor anywhere within the document once it is open, a blinking cursor should appear within your document.
- Click on “Edit” on the top menu of Microsoft Word and select “Select All” (OR Press “Ctrl” and “A” on your keyboard simultaneously).
- Click on “Edit” on the top menu again and select “Copy” (OR Press “Ctrl” and “C” on your keyboard simultaneously).
- Now, open a web browser (Internet Explorer or Firefox), go to your course, and access the Forum.
- Open the appropriate forum and topic.
- If you are adding a new post, click on “Post New Thread.” If you are replying to a message that has already been posted, open that message up and select “Reply.”
- Type a title in the title field.
- Click in the Message field. A blinking cursor should appear within the Message field.
- Click the Paste from Word button. Using this button rather than pasting directly helps clean up the formatting of your message.
- Click in the message space provided.
- Press “Ctrl” and “V” on your keyboard simultaneously.
- Click OK.
- Press “Submit.”
Q: When I copy and paste from a Word document into a forum, I get unusual symbols in my text. How do I get rid of these strange marks?
A: Be sure to use the Paste from Word button in the text editor toolbar. (It looks like a clipboard with a blue W.) This will clean up formatting and symbols from your text.
Q: What's the difference between a Forum, Topic, and Thread?
A: Within the Forums tool, you have three different levels of discussion:
- Forums
- Topics
- Threads
Forums are the top level. In PLS courses, each module has its own forum. The forum is a container for the topics within that module.
Topics are the middle level, found within forums. Each activity has its own topic with instructions to start the discussion. Within topics, you will find threads.
Threads are the individual discussion threads in response to a topic. When you start a new response to a topic, you are creating a thread. Each thread can contain an initial post with multiple replies.
Q: When I read a Forum thread and then use another tool, when I return to Forums it brings me back to the thread I was just reading. How do I get back to the main page of the Forums?
A: In the Forums tool, click the blue double arrows to the left of the word Forums to return to the main Forums page. This technique works for a number of the tools in Sakai; if you see the double arrows, they always reset you to the beginning entry point for the tool.
![]()
Q: How do I find new posts in the forums?
A: On the course home page, you will see a notification below the calendar showing the number of new posts in the forums. Click Forums either in that notification area or in the left navigation to open the Forums tool.
Within the Forums, you have several signals to show where new content has been posted.
- The conversation icon next to topics with new posts will be yellow instead of blue.
- Each topic shows the total number of messages and the number of unread messages (e.g., 42 messages, 31 unread).
- On a topic page, threads with unread messages are shown with the subject lines in bold text.
- The number of total and unread messages is also shown under the subject line for each thread.
- On topic pages, an envelope icon appears next to threads which are completely unread (i.e., you haven't read any of the messages in that thread).
- When viewing all messages in a thread, the subject lines of new posts are in bold and show an envelope next to the author's name.
When you view a thread, you may choose to just view the unread messages. At the top of the thread, choose Unread from the View dropdown menu.
Blog
Q: I typed my blog post text and clicked Save, but my text disappeared. Why?
A: Saving content for your blog posts is a two-step process. First, click Add to Document. Next, click Save. If you forget to click Add to Document, your text will be lost. It's a good idea to save your text in a word processing document so you have a backup copy just in case.
Q: Will anyone outside the course be able to read my blog entries?
A: No, your blog entries are only visible to people inside the course. They are not published publicly online.
Q: I posted to my blog, but my classmates can't see what I wrote. Why not?
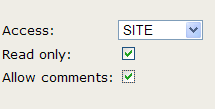
A: The most common reason a blog post will appear to you but not to your classmates or facilitator is because the access is set wrong. By default, all blog posts in Sakai are set to private, allowing you to create and save drafts without worrying about anyone seeing them before they are finished. However, if you don't change this access to Site, no one else can view your post, including your facilitator.
- To fix this, click on the title of your blog post.
- Click Edit.
- To the right of the Abstract, you will see options. (You may need to scroll to the right, especially if you are use a low screen resolution.) Make sure that Access is set to Site.
- Check the Allow Comments box if comments are part of the learning activity.
- When you are finished, click Save.
Q: My whole blog post showed up in the list of all posts. How do get just a summary to appear?
A: If you leave the Abstract space blank, your entire post (or at least the beginning of it) will appear in the list of posts. You can prevent this by adding a short summary in the Abstract field. You can also edit existing posts to add an abstract; once you save it with an abstract, the summary will appear below your post title instead of the whole post.
Q: Can I edit a blog comment?
A: Unfortunately, no, there is currently no way in Sakai to edit a blog comment. If you need to correct something or add to a comment you made, just post a new comment below your existing one.
Wiki
Q: What's the difference between editing a wiki page and commenting on it?
A: Editing a wiki page changes the content of the page itself; commenting happens below the page and is like a mini forum. When you have a small group wiki project, you can use the comment area to plan and discuss what you will post in the page itself. With small group work, the comments are used mostly for the process of collaboration, while the wiki page is where you post your product for grading.
Q: How will my facilitator know what work I did on the wiki?
A: Your facilitator (and everyone else within a course) can see each individual contribution to the wiki through the History. Check it out for yourself by visiting a page in the wiki and clicking the History button. You can compare the current version to any past revision or compare consecutive revisions to see what was changed at any point in the process. This means it is not generally necessary to sign your work with your name or initials; in fact, in most collaborative assignments where a group works together to create a unified product, it isn't appropriate to do so.
Q: Can multiple people edit the wiki at the same time?
A: Only one person can edit any single page in the wiki at once. If you happen to edit a page at the same time as another person, you will receive a warning message. Follow the instructions to avoid overwriting anyone else's text and wait until they are finished to add your own.
Q: Why is my picture just a placeholder instead of an image in the wiki?
A: There are two likely reasons an image might not work in the wiki.
First, make sure that the image is in a Resources folder that is shared publicly.
- In your Workspace Resources, click Actions > Edit Folder Details.
- Make sure the Availability and Access is set to "
- Click Update if you changed the Access or Cancel if it was set correctly.
Second, editing images in the wiki may not work if you use the Edit in Html option. This visual editor sometimes causes problems with images, including breaking the links to images that previously had been working. Make sure you use the default editor when you are working with images in the wiki.
Chat
Q: How do I know if anyone else is in the chat with me?
A: When other people are in the same chat room with you, their names will appear to the right of the chat area. This looks very similar to the list of names below the left navigation, but that shows everyone who is anywhere in the course, not just in the chat.
Calendar
Q: How can I change the time zone so it matches where I am?
A:
- In your Workspace, click Preferences in the left navigation.
- Click Time Zone.
- Select a location with the right time zone from the list. For example, if you want Central US time, select America/Chicago.
- Click Update Preferences.
A: Yes, you can add events to the Calendar in your Workspace (not the Calendar in your course).
- In your Workspace, click Calendar in the left navigation.
- Click Add.
- Enter all the information you want, being sure to complete all the required fields.
- Click Save Event.
Your event will now appear in your Workspace Calendar along with the events from your courses.
Grades
Q: How do I find my grades?
A: Click Gradebook in the left navigation to see your grades. You will only have access to grades after your facilitator has entered them.
Q: What does P or NP mean for my grade?
A: P and NP stand for Pass and No Pass. The passing grade is set to 77% as a default. Check with your facilitator for the specific grading scale used by your institution.
Q: How do I see my facilitator's comments on my assignments?
A: For most learning activities, including forum, blog, and wiki activities, you can see your facilitator's feedback in the gradebook. However, for individual assignments submitted through the Assignments tool, you must be in the Assignments tool to see your facilitator's comments.
- Click Assignments.
- Click the name of the assignment that has been returned.
- You can read your facilitator's comments here.
- If he or she made comments in an attached document, you can also download that file here.
- Click Back to list when you are finished.
Q: How do I review my results on a quiz?
A: Once you have taken an assessment in Tests and Quizzes, it will appear in your Submitted Assessments list. This is where you can review your score and answers.
- Go to Tests and Quizzes. Find your Submitted Assessments.
- Click the title of the quiz to see your responses and which questions you got correct. Depending on the quiz settings, you may or may not see the correct answers listed; you may only be able to see whether your answer was right or wrong.
- When you are finished reviewing your answers, click Return to Assessment List.
- To retake an assessment, click the title of the assessment under Take an Assessment. Note that your previous answers will be reset.
Some assessments may need to be manually graded by your facilitator. For example, short answer questions cannot be graded automatically by Sakai. Those questions will show a score of 0 until your facilitator has graded them.
Messages
Q: How do I send a message to more than one person?
A: For Windows users, hold the Ctrl key while clicking on each name. For Mac users, hold the Command key while clicking.
Downloading Files
Q: I clicked on a link, but my computer says that it cannot find the file.
A: You can access several types of files through links:
- For a PDF: make sure you have Acrobat® Reader® installed.
- For a Word document: Make sure you have a word processing program that can read .DOC files such as Microsoft Word or OpenOffice Writer.
- For a Web site or an article on a Web site: Alert your facilitator to your difficulties. The Web site may have changed.
- For other types of files: Check the directions in the course and on the Web site to see if another plugin like Flash or Shockwave is required.
Q: What is the difference between an RTF and PDF?
A : RTF is an abbreviation for Rich Text Format. It is a type of document file that most word processors (e.g., Microsoft Word and OpenOffice Writer) are able to read and write. PDF is an abbreviation for Portable Document Format, which is a type of file opened by using Adobe Reader.
Q: Why don't the PDF links open for me?
A: Adobe Reader is a plug-in that your browser uses to read pdfs. This plug-in is required to view any of the pdfs linked to in this course. Adobe Reader is a free program to download. Go to http://www.adobe.com/products/acrobat/readstep2.html to download Adobe Reader. Follow the instructions on the Adobe web site. Be sure you have a recent version.
Q: Some of the PDFs open for me, but some don't. What can I do?
A: Reload Adobe Reader or check for updates.
Q: Why don't the RTFs open for me?
A: You may not have a word processing program installed. RTFs can be opened in most word processing programs. Microsoft Word is the most common of these applications, but WordPad and OpenOffice Writer will also open RTFs. You can download OpenOffice Writer for free at OpenOffice.org.
External Sites
Q: What is appropriate to post on external sites like blogs and wikis outside of Sakai?
Use common sense and good professional judgment when participating in online communities and external sites, just like you do within this course. Assume that anything you post online outside Sakai could be found through a search engine and read by your principal or manager, grandmother, spouse or partner, and students. If you'd feel comfortable with all those people reading what you've written, it's probably fine to post.
Q: What do I do if I'm contacted by a spammer through an external site?
A: Nearly all online communities sometimes have problems with spammers. If you are contacted by someone who doesn't seem to actually be an educator or just makes you uncomfortable for any reason, ignore them, delete the comments, or report them following the directions on that site. You can also contact your facilitator for advice on how to handle a spammer appropriately. By practicing addressing these issues yourself, you will be better prepared to help your students deal with spammers and strangers online.